
Essential Motocross Protective Gear for Beginners
Table of Contents
- Why Protective Gear Matters for Beginner Motocross Riders
- Beginner Motocross Gear Checklist: What You Actually Need
- How to Choose Motocross Boots for Ankle and Foot Protection
- Motocross Body Armor for Beginners: Chest, Roost Guards, and Spine Protection
- Motocross Knee Braces vs Knee Guards: Which Should You Buy First
- Fitting, Certification, and Budget Priorities for Beginners
- Common Beginner Mistakes and How to Avoid Them
- Frequently Asked Questions
Last Updated: October 9, 2026
Why Protective Gear Matters for Beginner Motocross Riders
Motocross is risky: bikes are fast, terrain is unforgiving, and beginners crash. The difference between a minor and serious injury is often your gear.
Essential motocross protective gear isn't optional, it's the barrier between your body and the ground. A small loss of traction at 20 mph sends you down, and instinct won't save you.
Beginner Motocross Gear Checklist: What You Actually Need
The essential motocross protective gear checklist looks simple: helmet, goggles, boots, gloves, jersey, pants, body armor. But which pieces matter most on a tight budget?
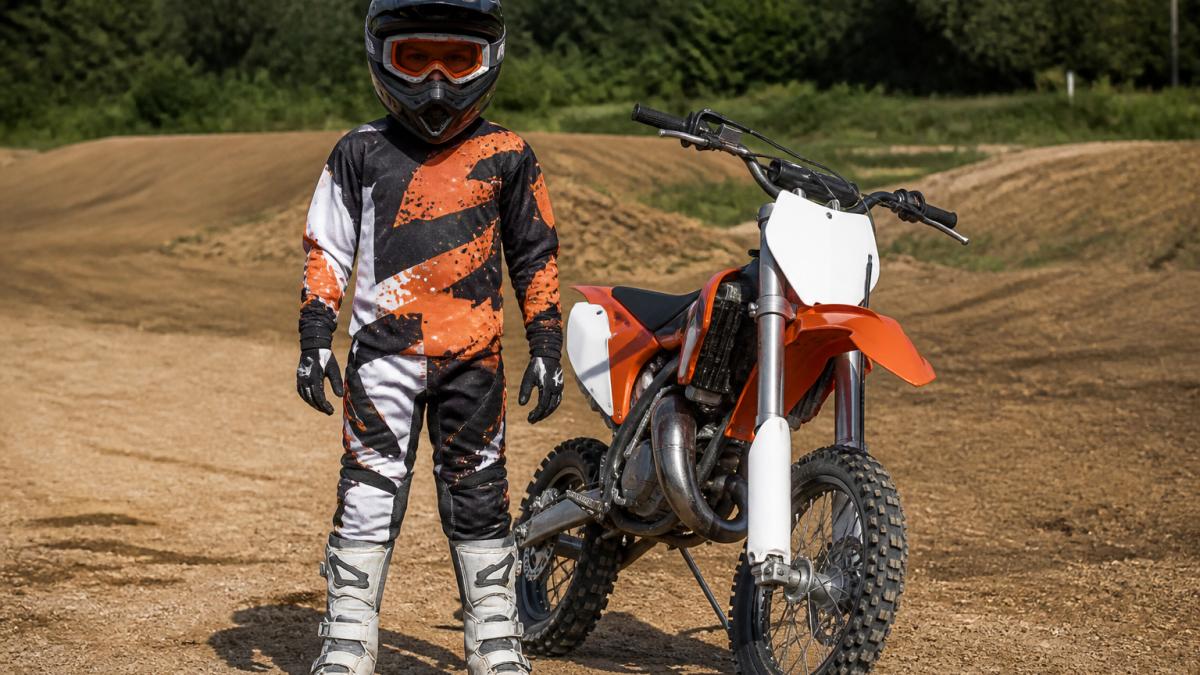
Start with the non-negotiables: helmet, goggles, boots, gloves, and riding apparel.
Helmet and Head Protection
Your helmet is the single most important piece of motocross protective gear. Head injuries don't heal like broken bones, and a quality helmet absorbs impact energy.
Motocross helmets differ from street helmets: a larger visor shields your face from roost (dirt kicked up by other riders) and sun, and the chin bar is reinforced for face-first crashes.
Look for proper ventilation, an overheated rider makes mistakes. The shell should feel snug but not tight, and shouldn't shift when you shake your head.
Goggles and Eye Protection
Goggles protect your eyes from dust, debris, and branches. Many beginners skip them or buy cheap ones, a mistake, since poor visibility leads to crashes.
Quality goggles have impact-resistant, anti-fog lenses and good peripheral vision. Amber or rose lenses suit overcast conditions; clear lenses suit bright sun.
The strap should hold goggles firmly without pressing into your face, uncomfortable goggles get pushed up mid-ride.
Jersey and Riding Pants
Motocross jerseys and pants are built for impact and abrasion; regular clothes tear instantly.
Jerseys should fit snug but allow arm movement, oversized ones bunch under armor. Pants must stay in place during falls; many riders wear suspenders.
Look for stretchy materials, since stiff fabric restricts your position on the bike.
Gloves and Hand Protection
Your hands hit the ground first in a crash. Full-finger gloves protect palms, knuckles, and fingers while improving grip.
Quality gloves have reinforced palms and knuckle protection, with fingers that move freely for throttle and brake control. Too-thick gloves make it hard to feel the bike.
Wrist support is a bonus, many gloves include straps or padding to prevent hyperextension injuries.
How to Choose Motocross Boots for Ankle and Foot Protection
Motocross boots are the second most important piece of protective gear after your helmet, and the piece beginners most often buy wrong. A motocross boot is purpose-built to stop your ankle folding in directions it was never meant to bend.
What a Motocross Boot Actually Does
Four mechanisms do the real work:
- Rigid shin plate. A hard plastic or composite plate runs from the top of the boot down over the shin. It absorbs roost, deflects the footpeg, and spreads impact across a wide area.
- Ankle hinge or pivot. Better boots have a mechanical hinge that allows forward and backward flex (so you can shift and brake) while resisting sideways roll and hyperextension. This separates a real motocross boot from a casual riding boot.
- Reinforced toe box and heel cup. The toe is stiffened to resist crushing when your foot is trapped under the bike, and the heel cup locks your heel down on impact.
Sizing a Motocross Boot Correctly
Motocross boots are sized differently from street shoes. You want a snug boot, not a roomy one.
- Measure your foot in the afternoon, when feet are largest, wearing the same sock thickness you will ride in.
- Your heel should not lift when you walk or push off. If it does, the boot is too big and your ankle will move inside it during a crash.
- Your toes should lightly brush the front of the boot, not float with a gap, which means your foot slides forward on hard landings.
Break-In and Pressure Points
New motocross boots are stiff by design, that stiffness is the protection. Expect a break-in period of several short rides:
- Wear the boots indoors for 20-30 minutes at a time to soften the panels.
- Buckle them fully and walk, squat, and shift your weight to find pressure points.
- Adjust buckle tension per strap, a tight top strap with a loose lower strap creates hot spots.
If a pressure point persists after a few hours, the boot is the wrong shape for your foot. Do not "ride through it", foot pain makes you ride tense, and a tense rider makes mistakes.
New vs. Used Boots
Used boots are a legitimate budget option, but inspect them first:
- Sole wear. A sole worn to the midsole has lost its peg grip and structural support.
- Hinge play. A hinge that flops freely no longer resists sideways roll.
- Cracked plastic. Cracks in the shin plate or toe box mean the boot may fail on the next impact.
A used boot in good condition protects far better than a new cheap boot with no hinge and a soft sole. Spend your budget on structure, not graphics.
Motocross Body Armor for Beginners: Chest, Roost Guards, and Spine Protection
Body armor protects your torso, ribs, and spine. Beginners often delay buying armor, thinking it's optional. It's not.
Chest protectors come in two styles: rigid plastic shells (more protection, less comfortable) and soft padding (more comfortable, less protection).
Roost guards attach to your chest protector and shield your lower ribs and abdomen from flying debris, especially important when riding with others.
Motocross Knee Braces vs Knee Guards: Which Should You Buy First
Knees take a beating in motocross from constant weight shifts and gripping the bike. Knee guards protect against impacts and abrasion; knee braces stabilize the joint itself.
Knee guards are cheaper and easier to start with, foam or plastic shells covering your kneecap and shin. Most beginners should start here.
Knee braces are stiffer and pricier, limiting sideways knee movement to prevent certain injuries. If you have knee problems or plan to ride seriously, they're worth it.
Many experienced riders wear both, a brace for support and a guard over it for impact protection.
Fitting, Certification, and Budget Priorities for Beginners
Most beginner gear guides stop at naming the equipment. What actually keeps you safe, and saves money, is knowing how gear should fit, what certification labels mean, and which purchases to make first.
Understanding DOT, ECE, and Snell Certifications
Helmet certifications are test standards, not marketing badges, and each tests for different things.
- DOT (Department of Transportation). The federal minimum for helmets sold for on-road use in the United States, testing impact absorption and penetration resistance. A DOT label means a baseline was met, not that the helmet is high quality.
- ECE 22.06. The current European standard, often stricter than DOT on rotational and oblique impacts. Many motocross helmets sold in the U.S. carry ECE alongside DOT.
- Snell M2020D / M2020R. An independent, voluntary standard generally stricter than DOT on impact energy management. Common in motocross and off-road use.
How to verify certification before buying:
- Look for the certification label inside the helmet, usually sewn into the comfort liner or on a sticker under the padding.
- Check the manufacturer's product page for specific standard numbers, not just the word "certified."
- Be skeptical of helmets sold at swap meets or discount sites with no label. Counterfeit and mislabeled helmets exist.
Getting the Fit Right
A helmet that does not fit correctly will not protect you, no matter its certification. Fit is the difference between a helmet that stays on in a crash and one that rolls off.
Measure your head first.
- Use a soft measuring tape around your head, about one inch above your eyebrows and around the widest point at the back.
- Measure in centimeters and compare to the manufacturer's size chart. Sizes vary between brands.
The fit checks that matter:
- Snug all around. The helmet should contact your head evenly with no gaps, pressure, not pain.
- Cheek pads touch. Your cheeks should press against the pads without pinching. Motocross helmets have firmer cheek pads than street helmets to hold steady at speed.
- No rocking. With the chin strap buckled, rock the helmet forward, back, and side to side. It should move your scalp with it, not slide independently.
Prioritizing Your Purchases on a Limited Budget
You do not have to buy everything at once, but you do have to buy in the right order. Protection is not equal across gear categories, and the order below reflects injury severity and how often each piece is used.
Tier 1, Do not ride without these:
- Helmet. Head injuries are the most catastrophic and least recoverable. Buy the best-fitting, properly certified helmet you can afford.
- Goggles. You cannot ride what you cannot see. Dust and debris cause crashes, and cheap goggles fog and scratch.
- Boots. Ankle and foot injuries are among the most common motocross injuries, and a real motocross boot is the only gear that prevents them.
- Gloves. Your hands hit the ground first. Full-finger gloves with reinforced palms protect the hands you need daily.
Tier 2, Add as soon as you can:
- Jersey and riding pants. Abrasion protection and a base layer that holds other gear in place.
- Chest protector or roost guard. Torso and rib protection, especially when riding with others.
- Knee guards. Impact and abrasion protection for the joint you grip the bike with.
Tier 3, Upgrade once you are riding regularly:
- Knee braces. Support and stability for riders with knee history or serious track ambitions.
- Spine protector. Lightweight, low-bulk protection for the spine in a serious crash.
- Neck brace or neck protection. Consider once riding at track speeds or in close groups.
Layering and Compatibility
Gear that fits individually can still fail together. A few compatibility checks save you from buying pieces that fight each other:
- Goggles and helmet. The goggle frame should seat against the helmet's eye port without gaps; a too-wide goggle will not seal, and dust will get in.
- Chest protector and jersey. Wear it over or under the jersey depending on design, most roost guards go over, most full body armor goes under. Check the manufacturer's guidance.
- Knee guards and boots. The top of the boot and bottom of the knee guard should overlap without pinching behind the knee.
When in doubt, bring your existing gear to the shop and test the new piece against it. Fit problems you can see in the store are fit problems you will not discover mid-crash.
Common Beginner Mistakes and How to Avoid Them
Beginners make predictable mistakes with protective gear. Knowing them helps you avoid them.
Buying gear that's too large. Oversized gear shifts during crashes and loses effectiveness.
Skipping goggles or using cheap ones. Poor visibility leads to crashes.
Wearing gear that's uncomfortable. Uncomfortable gear gets taken off or worn incorrectly.
Buying the cheapest option. Protective gear is not the place to save money.
Frequently Asked Questions
What protective gear should a beginner motocross rider wear?
Beginners need a DOT or ECE-certified helmet, goggles, off-road jersey and pants, full-finger gloves, motocross boots with ankle support, and at minimum a chest protector or roost guard. Knee guards or braces and elbow pads add critical impact protection. Start with helmet, boots, and gloves as your foundation, these are non-negotiable. Body armor can be added as your budget allows and your riding progresses.
How should motocross protective gear fit?
Helmet should sit level on your head with one finger of space between your forehead and the helmet interior. Goggles need a seal around your eye area without gaps. Boots should be snug around the ankle and calf with no heel lift. Gloves should allow full finger movement without excess material. Jersey and pants should be tight enough to stay in place during falls but loose enough for unrestricted arm and leg movement. Ill-fitting gear reduces protection and comfort, try on whenever possible.
What is the best body protector for motocross?
For beginners, start with a chest protector and roost guard as a combined unit, this covers the torso and collarbone area where impacts are common. Look for impact-absorbing foam and ventilation to manage heat during riding. As you progress, add a spine protector and neck brace for additional support. Roost guards specifically protect against flying debris and impacts to the chest; they're essential for trail and track riding. Choose armor that fits snugly without restricting breathing or movement.
How much should a beginner spend on motocross gear?
Budget depends on how many pieces you buy at once and the quality level you choose. Prioritize spending on a quality helmet first, this is your most critical safety investment. Boots and gloves are next. Focus on essential protective gear for head, feet, and hands before adding body armor. Quality matters for safety and durability, especially with kids who are rough on gear. Check Moto Dad Racing for current pricing and options that fit your budget.
Getting into motocross with your family is exciting. Proper protective gear makes it safer and more enjoyable. When you're not worried about injury, you can focus on improving your skills and having fun. At Moto Dad Racing, we believe families should ride together with confidence. Start with essential motocross protective gear that fits well and meets safety standards. Build your setup over time. Ride safely, and enjoy the sport you love with the people you love.