
Motocross Apparel Sizing Guide for Kids: Fit Right
Table of Contents
- Youth Motocross Gear Size Chart: Quick Reference
- How to Measure Kids for Dirt Bike Gear
- Understanding Jersey and Pant Sizing for Youth Riders
- Fitting Youth Chest Protectors and Protective Gear
- Youth Motocross Protective Gear Worth the Investment
- Brand Sizing Variance and Growth Spurt Allowance
- Gear Weight, Mobility, and Second-Hand Sizing Tips
- Frequently Asked Questions
Last Updated: September 12, 2026
Youth Motocross Gear Size Chart: Quick Reference
Youth motocross apparel sizing runs small and every brand cuts differently. This guide from Moto Dad Racing shows how to measure your child, read size charts, and pick gear that protects without restricting movement, avoiding the two most common mistakes: buying by age instead of measurements, and forgetting to leave room for growth.
| Gear Item | Key Measurement | Typical Youth Range | Fit Priority |
|---|---|---|---|
| Jersey | Chest circumference | Youth S to Youth L | Snug, allows full arm swing |
| Pants | Waist + inseam | Youth 20 to Youth 28 | Room at knees, adjustable waist |
| Chest protector | Chest + torso length | One-size adjustable | Snug over jersey, no shifting |
| Boots | Foot length in cm | Youth 1 to Youth 6 | Toe room, ankle lock |
| Gloves | Palm circumference | Youth XS to Youth L | Snug at fingers, no bunching |
| Helmet | Head circumference | Youth S to Youth M | Snug all around, no pressure points |
A properly fitted set stays in place during a crash and lets your kid move naturally. The chart is your starting point, but measurements matter more than labels.
How to Measure Kids for Dirt Bike Gear
Measuring your child for dirt bike gear takes about ten minutes and a flexible measuring tape. Measure over a thin t-shirt, not bulky clothing, and measure twice to catch errors. According to the Consumer Product Safety Commission's guidance on protective equipment, proper fit is one of the most overlooked factors in youth riding safety.
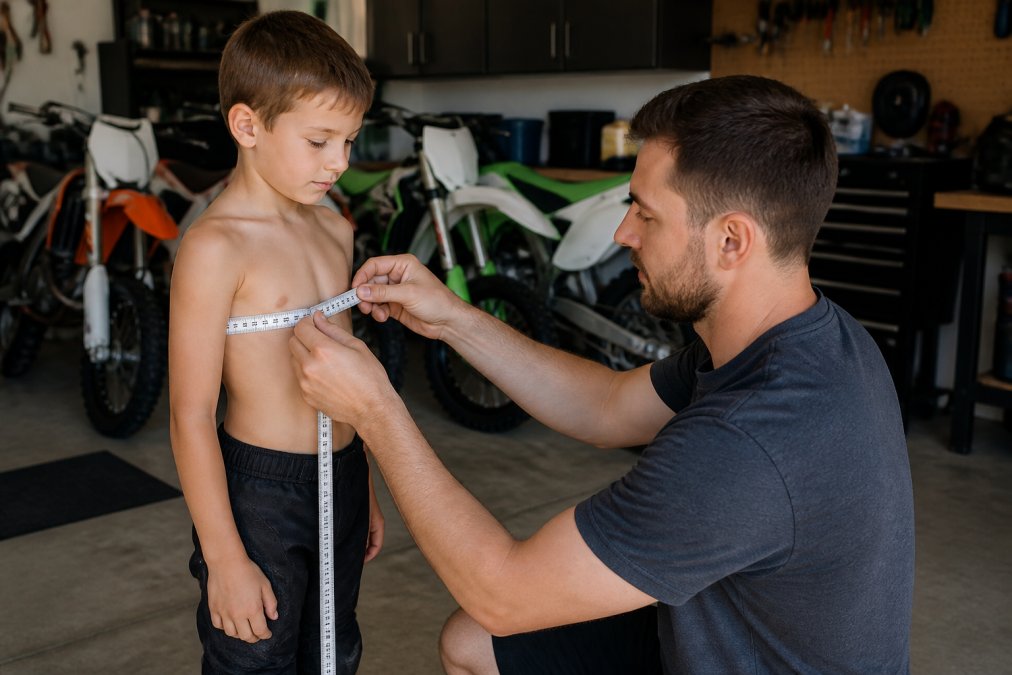
Step-by-Step Measurement Guide
- Chest: Wrap the tape around the fullest part of the chest, under the arms. Keep it level and snug, not tight.
- Waist: Measure at the natural waistline, usually just above the hip bone.
- Inseam: Have your child stand straight. Measure from the crotch seam down to the top of the foot.
- Sleeve length: Measure from the shoulder seam to the wrist bone with the arm slightly bent.
- Head circumference: Wrap the tape around the widest part of the head, just above the eyebrows and ears.
- Foot length: Stand on paper, mark the heel and longest toe, then measure in centimeters.
- Palm circumference: Wrap the tape around the widest part of the hand, excluding the thumb.
Write every number down before you shop. Kids grow unevenly, so fresh measurements each season save returns and frustration.
Understanding Jersey and Pant Sizing for Youth Riders
Youth motocross apparel sizing splits into two fits: jerseys follow upper-body measurements, pants follow lower-body proportions. Treating them as a matched set is where most parents go wrong, a child can wear a Youth Medium jersey and Youth Small pants in the same order.
Jersey Fit: Snug but Not Restrictive
A jersey should sit close without pinching. Snug fit keeps chest protectors and neck braces in position and prevents snagging. Have your child raise both arms overhead and swing forward; if the fabric pulls across the shoulders, size up.
Pant Fit: Waist, Inseam, and Knee Room
Pant sizing comes down to three numbers: waist, inseam, and knee clearance. Riding pants have pre-bent knees for a seated posture, so never judge fit standing straight.
Have them sit with knees bent at roughly 90 degrees. The waist should stay put, knees should have full range of motion, and the pant leg should reach the boot top without bunching. Waist tabs extend usable life through a growth spurt.
Fitting Youth Chest Protectors and Protective Gear
Fitting youth chest protectors is about coverage and stability, not a size number. Most use adjustable shoulder and side straps, so aim for a snug fit over the jersey that doesn't shift, covering chest, back, and shoulders without limiting breathing or arm movement.
How to Measure for a Youth Chest Protector
Chest protectors are sized by chest circumference and torso length. Measure chest at the fullest part, under the arms, over a thin t-shirt, then torso from shoulder top to natural waist. Compare both to the brand's chart, a protector that matches on chest but runs short on torso rides up over the ribs and exposes the lower back.
Youth protectors are sold as one-size-adjustable, but the range is narrower than parents expect. If your child is at the top of the chest range, the side straps may already be maxed out, so the protector sits high and shifts. Size up rather than forcing the straps.
Fit Test: What 'Snug' Actually Means
Test it like this: have your child wear the protector over their jersey, then do ten jumping jacks and a few arm circles. If it rides up, slides sideways, or restricts breathing, adjust the straps or size down. Impact protection only works when the pad stays put, a loose protector gives false confidence.
Check three contact points after the movement test:
- Shoulders: The shoulder cups should sit on top of the shoulders, not slide toward the neck.
- Sides: The side straps should stay flat against the ribs, not gap open when arms raise.
- Back: The back plate should cover the spine from the base of the neck to the lower back without a gap at the waist.
If any point fails, the protector is the wrong size or the straps need re-routing. Most youth protectors have two or three adjustment points; work through them one at a time.
Gloves, Knee Guards, and Elbow Guards
Gloves deserve the same attention. Youth glove sizing runs on palm circumference, and gloves should be snug at the fingers with no bunching in the palm, which causes blisters and reduces grip control. Measure the widest part of the hand, excluding the thumb, and check that fingertips reach the end without curling.
Knee and elbow guards are sized by limb circumference, not height. Measure the thigh just above the knee and the upper arm just above the elbow. Guards should stay in place when the joint bends; if they rotate or slide during a squat or arm bend, they're too loose.
For families who ride together, matching gear adds a layer of fun that keeps kids engaged. Moto Dad Racing offers motocross-themed apparel for the whole family, including a youth "Eat Sleep Ride" tee built on soft ring-spun cotton that holds up to repeated washing. It's the kind of gear kids actually want to wear off the bike, which makes gearing up for practice a lot less of a fight.

Youth Motocross Protective Gear Worth the Investment
Youth motocross protective gear is worth the investment when it fits and covers the right areas. Priority order: helmet, boots, chest protector and body armor, then knee and elbow guards. Helmets and boots protect against season-ending injuries; the rest protect against practice-ending ones.
Look for gear that meets recognized safety standards. The DOT helmet certification requirements set a baseline for motorcycle helmets, and youth gear should carry clear certification labeling. Boots should have a rigid sole and ankle support, not just a stiff upper.
For families who ride together, matching gear adds a layer of fun that keeps kids engaged. Moto Dad Racing offers motocross-themed apparel for the whole family, including a youth "Eat Sleep Ride" tee built on soft ring-spun cotton that holds up to repeated washing. It's the kind of gear kids actually want to wear off the bike, which makes gearing up for practice a lot less of a fight.
Brand Sizing Variance and Growth Spurt Allowance
Brand sizing variance is the number one reason youth motocross apparel gets returned. Two jerseys labeled Youth Medium can differ by several centimeters across the chest. Always check the specific brand's size chart; never assume the label transfers.
Growth spurt allowance is the factor most guides skip. Kids ages 6 to 12 can grow several centimeters in a season. How to handle it:
- Jerseys: Size up one step if your child is mid-growth-spurt. Slightly loose sleeves are fine; a tight chest is not.
- Pants: Stay true to size and rely on waist adjustment tabs. Pants that are too long catch on the footpeg.
- Boots: Buy for the current foot size with a finger's width of toe room. Never buy two sizes up.
- Helmets: Never size up for growth. Replace when the helmet gets tight.
- Chest protectors: Adjustable straps handle most growth, so these last the longest.
A practical rule: buy the gear that fits today for safety-critical items, and allow a little room only on non-critical apparel like jerseys and hoodies.
Gear Weight, Mobility, and Second-Hand Sizing Tips
Gear weight matters more for kids than adults. A chest protector that feels light to you can feel heavy to a 6-year-old, and heavy gear reduces mobility, making riding harder and less fun. When comparing options, pick the lighter protector and more flexible boot, provided both meet safety standards.
How Gear Weight Affects Control Inputs
Sizing and weight interact in a way most guides ignore: gear one size too large moves the weight away from the body. A protector hanging off the shoulders puts weight on the collarbone and upper arms, tiring a young rider and making it harder to hold the bars steady. An oversized boot lets the foot slide inside the shell, so the rider grips with their toes to feel the brake and shift levers.
Judge it with the 'control reach' test. With the child seated on the bike in riding position, check they can reach and operate the brake lever, clutch lever (if equipped), and shift lever without shifting weight or looking down. If they have to stretch or reposition a foot, the gear is too heavy, too large, or both, a problem a static size chart can't catch.
For younger riders, lighter gear is usually better even with slightly less coverage, because a rider who moves freely can react. For older or faster riders, the trade-off shifts toward more coverage and stiffer protection, since impact forces are higher.
Second-Hand Gear: What to Check Before You Buy
Second-hand gear can keep costs down, but it comes with sizing caveats. Used jerseys and pants often stretch or shrink after washing, so the labeled size may no longer match reality. Always measure the garment, not the tag.
Use this checklist before buying any used youth motocross gear:
- Jerseys and pants: Lay flat and measure chest, waist, and inseam yourself. Washing and drying can shrink youth motocross pants by a full size, so the tag is often unreliable. Check for stretched-out waistbands and worn knee panels.
- Chest protectors: Inspect the straps for fraying or stretched elastic. A protector whose straps no longer hold tension will not stay in place, no matter how good the shell looks.
- Boots: Check the sole for wear at the peg contact points, the ankle hinge for play, and the buckles for cracks. Used boots lose ankle support over time, and a boot that flexes too easily no longer protects the ankle.
- Knee and elbow guards: Check the hard shell for cracks and the liner for compressed foam. Compressed foam does not recover its impact absorption.
- Helmets: Buy new. A used helmet may have invisible impact damage, and the protective foam can degrade over time even without a crash.
For coordinated gear without the second-hand guesswork, Moto Dad Racing designs family-focused motocross apparel with consistent sizing across the collection, so parents and kids can match without ordering three sizes to find one that fits.
Frequently Asked Questions
How should kids' motocross jerseys and pants fit?
Jerseys should fit snug but allow full range of motion. Pants need a secure waist with room to bend at the knees. A good test: have your child squat and reach forward. If the fabric pulls tight or restricts movement, size up. Youth motocross apparel sizing runs differently across brands, so always check the specific size chart.
Do youth motocross gear sizes run small or large?
It varies by brand. Some youth smalls fit like a 5-6, others like a 6-7. Always measure your child's chest, waist, and inseam before ordering. Compare those numbers to the brand's chart. When between sizes, size up for growth room, but not so much that protection shifts out of place.
What safety gear is essential for kids starting motocross?
At minimum: a DOT-certified helmet, chest protector, and gloves. Youth motocross protective gear worth the investment includes items that fit properly and meet safety standards. Ill-fitting gear, even if expensive, will not protect your child.
How do I measure my child for motocross protective gear?
Use a flexible measuring tape. Measure chest at the fullest point, waist at the natural waistline, and inseam from crotch to ankle. For helmets, measure head circumference above the eyebrows. Write down all numbers and compare to each brand's chart. Re-measure every few months during growth spurts.
Should I buy motocross gear with room to grow?
A little room helps, but too much is unsafe. Protective gear must stay in place during a crash. A chest protector that slides up or knee guards that twist offer less protection. Buy for current fit with about one size of growth room. Replace gear when it becomes too tight or restricts movement.
At what age can kids start wearing motocross apparel?
Children as young as 3 can wear youth motocross apparel if they ride. Brands offer youth small through youth large, which fits most kids ages 4-12. Toddler sizes exist for the youngest riders. Focus on proper fit and safety standards rather than age labels on the tag.